1: – Open up the printer’s back cover
[you will find there two boards… you need to focus on the smaller one]
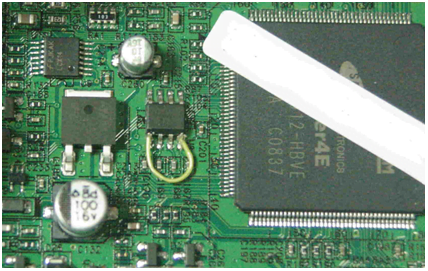
2: – Find the 93c66 chip [it’s a tiny chip on the board as shown in this picture: http://img528.imageshack.us/img528/7835/reset.jpg the chip you are looking for is the one that has that green wire on it… yours won’t have the wire on it…]

3: – Focus on pins 1 & 4 [looking at the picture will help you identify them… in the picture… it’s the two pins that are connected with the green wire]
4: – As soldering might be difficult [it was for me :P] you can find a paper clip, open it up… and connect the two ends to the two pins [imagine that the green wire is actually your paper
clip] IMPORTANT: don’t touch the paper clip with your fingers, use some nippers [gosh :)) i don’t know the word in english for this 😛 … it’s “cleste” or “patent” in romanian]
5: – As you have the paper clip connected, turn the printer on… wait for 15 seconds…
[if you will pay attention to the control light on the front of the printer… you will notice that it will be red for a while, and then green… don’t exactly know the order :P]
6: – Turn the printer off… disconnect the paper clip…
7: – Put the cover back…
further actions: when your printer will stop printing after other 2100 pages… just repeat steps 1 to 7 [7 being the most important, obviously :P]
hope this helps… iain’t got any other useful information to provide for succeeding in this process [manka is still the MAN :P]